
How to Read an Umamusume Support Card Tier List
Support card tier lists are popular because Umamusume decks are hard to evaluate quickly. A single card can affect training value, bond speed, event recovery, hint access, race bonus, and the final stat shape. Rankings compress all of that into a simple label, but the label only helps when you understand what the card is being ranked for.
Most lists are built around a specific server state, scenario, card pool, and assumption about limit breaks. That means the same card can be excellent for one player and awkward for another. A fresh Global account, a JP account with many MLB supports, and a casual trainer farming parents do not need the same deck.
Use a tier list as a question generator: why is this card rated highly, what role does it solve, and can my account actually use that role in the race I am preparing?
Do not copy the label
Before investing resources, write the target distance, running style, scenario, support slot count, and card limit break. Those five details decide whether a tier label applies to your build.
What Actually Changes a Support Card's Tier
A useful ranking considers more than rarity. These are the factors that usually explain why a card rises or falls in a support card tier list.
| Factor | Why it matters | How to check it |
|---|---|---|
| Training role | Speed, Stamina, Power, Guts, Wit, friend, and group cards solve different build problems. | Compare the card role against the stat that your target race cannot miss. |
| Limit break | Many cards change sharply between 0LB, 1-3LB, and MLB because training value and bonuses scale. | Check your own copy, not only the tier list's assumed maxed version. |
| Hint and skill package | Some cards are valuable because they unlock acceleration, recovery, or strategy-specific skills. | Verify whether the skill timing matches your race distance and running style. |
| Scenario fit | A card can be strong in one training scenario and average in another if mechanics reward different stats. | Read tier notes for the current scenario before borrowing a deck template. |
| Race bonus and consistency | Race-heavy plans may value bonus, events, energy, and mood stability more than raw training spikes. | Use race bonus planning when your schedule includes many optional races. |
If a list does not state server, scenario, limit-break assumption, or ranking criteria, treat it as a broad signal rather than investment advice.
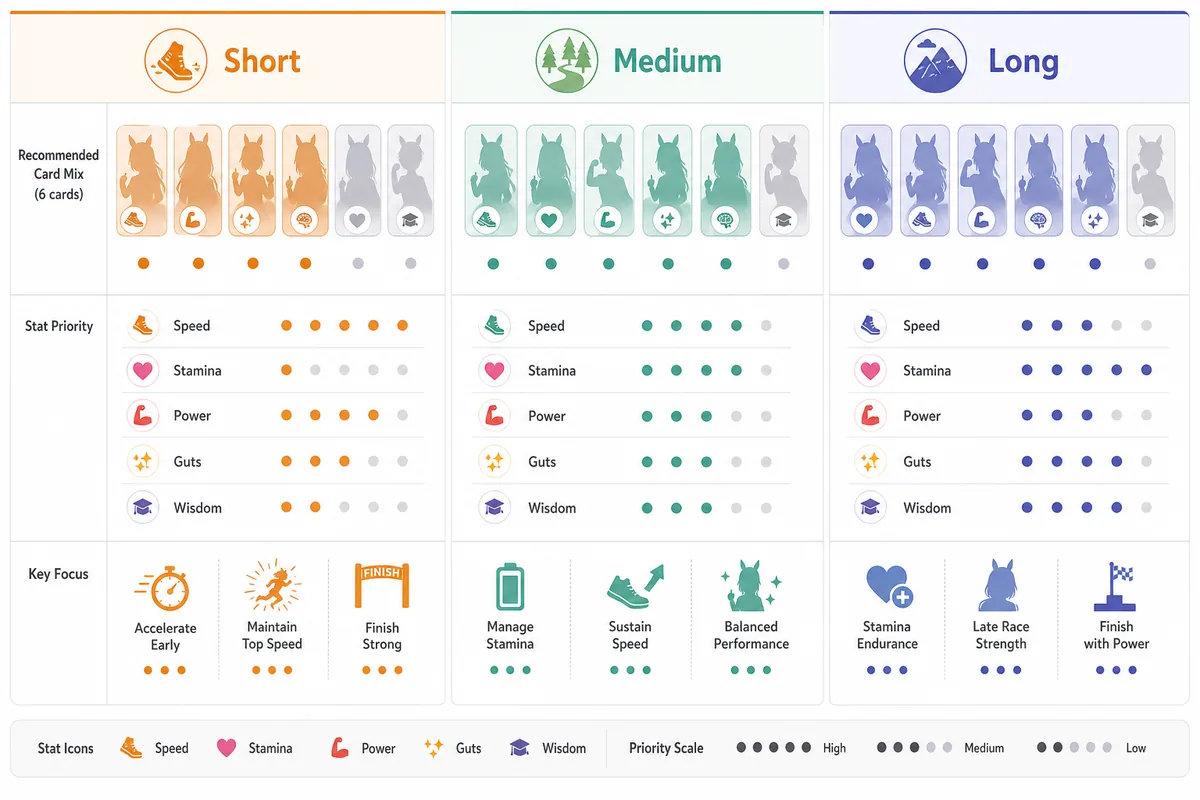
Deck Roles by Race Distance
The best support deck is tied to the runner you are building. Use the table as a planning frame before comparing specific card names.
| Race focus | Common deck pressure | Support card priority | Simulator check |
|---|---|---|---|
| Sprint / Mile | Speed ceiling, Power for positioning, Wit for consistency | Speed and Wit cards with useful acceleration or positioning hints | Test whether the runner can reach final speed and activate skills on the correct phase. |
| Medium | Balanced stat shape and enough stamina buffer | Speed plus Stamina or Power support depending on character bonuses | Check stamina and late-race consistency before adding more Speed. |
| Long | Stamina floor, recovery skills, and still enough Speed | Stamina support, recovery access, and cards that do not collapse Speed growth | Run stamina calculation before trusting a high-Speed long-distance build. |
| Parent farming | Stable runs, race schedule, and factor targets | Consistency, race bonus, and cards that make the farming loop repeatable | Use the planner to keep required races and factor goals aligned. |
A Practical Support Card Decision Workflow
Use this loop when a tier list gives you several good choices but your account cannot run the exact sample deck.
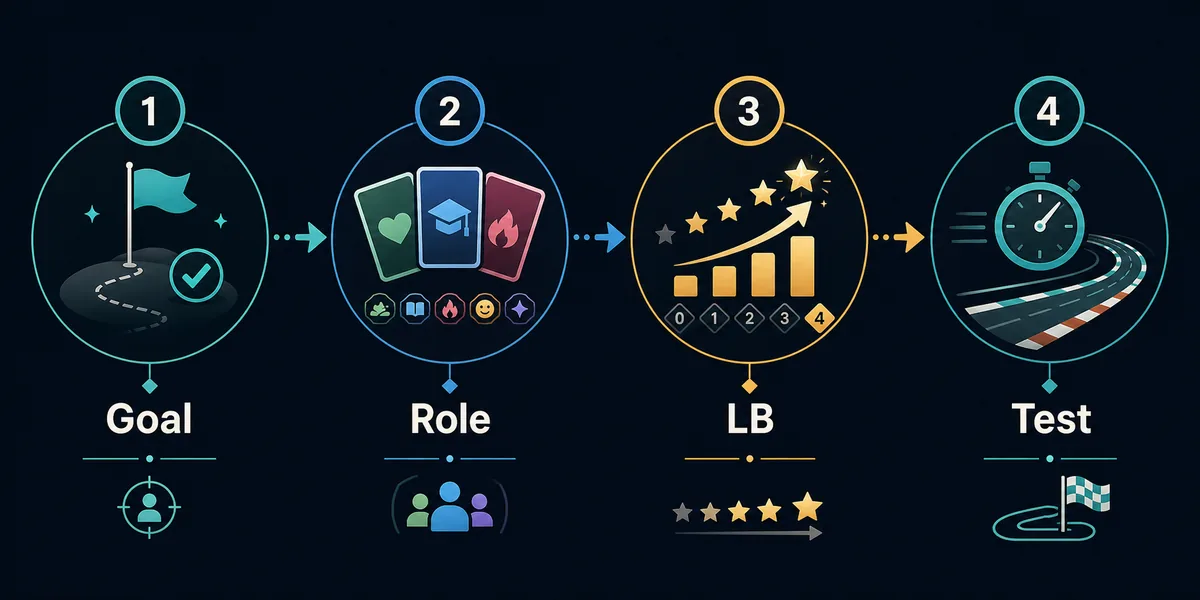
Define the build goal
Pick the target race, distance, surface, running style, and minimum stamina before choosing supports.
Separate owned cards from borrow targets
Your borrow slot should solve the hardest missing role, not automatically copy the highest-rated card.
Check limit breaks
A lower-tier MLB card can outperform a famous card at low limit break when training value and bonuses matter.
Map each card to a job
Assign every support slot a reason: stat growth, skill access, race bonus, recovery, consistency, or scenario mechanic.
Test the finished idea
After training, compare the final build in stamina and race tools before spending more resources on the same deck.
When You Should Ignore a Tier List
Tier lists are useful, but these situations are common exceptions:
- Your card is not at the assumed limit break. If the list rates MLB performance and your copy is 0LB, compare actual bonuses before investing.
- The tier list targets a different scenario. Scenario mechanics can change whether stat-heavy, hint-heavy, or consistency cards are preferred.
- Your race distance needs a different stat profile. A short-race deck and long-race deck can rank support roles very differently.
- You already have the skill elsewhere. A card chosen mainly for one skill loses value if the runner, parent, or another support already covers that skill.
- You are farming, not finishing a PvP runner. Parent farming may prioritize stable race schedules and repeatability over peak final stats.
Use Support Card Rankings with Race Tools
A tier list helps you choose a deck before training. Race tools help you judge whether the finished runner is good enough after training. The strongest workflow uses both instead of treating the tier list as the final answer.
For example, if a long-distance leader looks strong on paper but fails simulation, the problem might not be the tier of the Speed card. It may be stamina, recovery timing, Power, Wit, inherited aptitude, or the race schedule used to reach the final stat screen.
- Pick a deck role from the tier list, not only a card name.
- Use the race bonus calculator when the plan includes many optional races.
- Check stamina before accepting medium or long-distance builds.
- Run the final stats through the race simulator and compare one variable at a time.
- Update the next training run based on the weakest tested variable.
Useful internal tools for this workflow: Race Bonus Calculator, Stamina Calculator, Uma Race Planner, Training Simulator Guide.
Sources and Reference Links
These references support the guide's decision framework and give you official or community data to check specific card details.
- Umamusume Pretty Derby official site - Official game context and franchise information.
- Umamusume Pretty Derby on Steam - Official PC store listing for Global players.
- GameTora Support Card List - Community support-card database for card details and skills.
- Euophrys Support Card Tier List - Community tier list reference used as a ranking-style SERP example.
FAQ
What is the best support card in Umamusume?
There is no universal best card for every account. The best card is the one that solves your target race, scenario, limit-break, and deck-role problem.
Should beginners follow an Umamusume support card tier list exactly?
Beginners should use tier lists to learn which cards are broadly strong, but they should still check owned limit breaks, borrow options, and race distance needs.
Is an MLB lower-tier card better than a 0LB top-tier card?
Often yes, especially when training value, bonuses, and consistency are the reason the card is used. Compare the actual card state before deciding.
How many Speed cards should I use?
It depends on race distance, character bonuses, scenario, and support pool. Sprint and mile builds often need more Speed pressure, while long races must protect stamina and recovery.
Should I spend jewels based on a tier list?
Use tier lists as one input, not the only reason. Check the banner timing, your existing deck, borrow options, and whether the card helps multiple builds.
How do I test if my support deck worked?
After training, test the final stat profile with stamina and race simulation tools. If the runner fails, identify whether stats, skills, stamina, or strategy caused the problem.