
What Is the Umalator?
The Umalator — short for Uma Musume Simulator — is a free Uma Race Simulator for Umamusume: Pretty Derby players. You enter a character's stats, racing strategy, skills, and target course, then run simulated races to see how an Umamusume build performs before spending training resources.
Originally developed by the community (based on alpha123's open-source uma-tools project), the Umalator reverse-engineers the game's actual race physics engine. That means it accounts for real mechanics: stamina drain curves, skill activation windows, position-keeping logic, and final spurt triggers — not simplified approximations.
Think of it as a flight simulator for your horse girls. You wouldn't fly a real plane without practicing in a simulator first. The same logic applies here.
Quick Definition
Umalator = Uma Race Simulator. It's a free online tool that simulates Umamusume Pretty Derby races using real game mechanics, so you can test builds without spending in-game resources.
Why Simulate Before You Train?
Training a single Uma Musume to competitive level takes hours. Support cards, energy drinks, scenario choices — every decision compounds. If you discover at the end that your stamina is 200 points short for your target race distance, that run is essentially wasted.
The Uma Race Simulator solves this by letting you test the destination before you start the journey. Here's what you gain:
Save Training Resources
Know your stat targets before you start. No more finishing a run only to realize your Speed is 150 points too low for the final race.
Competitive Edge
Top Champions Meeting players run 50–100 simulations per build. That's not obsession — it's how you find the 3% win-rate difference that separates first place from fourth.
Learn Game Mechanics
Watching your Uma run out of stamina at the 200m mark teaches you more about stamina requirements than any written guide. The simulator makes abstract mechanics tangible.
Isolate Variables
Swap one skill, re-run 30 sims, compare win rates. The simulator lets you run controlled experiments that are impossible in the actual game.
Understanding the 5 Core Stats
Before you can use the simulator effectively, you need to understand what you're inputting. Umamusume Pretty Derby has five core stats, each affecting race performance in distinct ways.
One critical rule applies to all stats: values above 1,200 are subject to diminishing returns — the game internally halves any points beyond that threshold. A Speed stat of 1,500 is calculated as 1,350 in practice (1,200 + 150). This makes the 1,200 mark a key efficiency breakpoint.
Diminishing Returns Rule
All stats cap at 2,000. Points above 1,200 are halved in calculations. Plan your training targets accordingly.
The 5 Stats at a Glance
| Stat | Primary Role | Key Breakpoints | Priority by Distance |
|---|---|---|---|
| Speed | Maximum running velocity — the single most impactful stat | 901 / 1,200 / 1,600 |
All distances — always prioritize |
| Stamina | Fuel tank — determines how long your Uma can sustain top speed | Varies by distance (see table below) |
Mid / Long — critical; Sprint — moderate |
| Power | Acceleration and speed maintenance during position changes | 600 / 900 |
Sprint / Mile — high; Mid / Long — moderate |
| Guts | Recovery under pressure; reduces speed loss when stamina is low | 300 (Sprint/Mile) / 400 (Mid/Long) |
All distances — secondary support stat |
| Wisdom (Wit) | Skill activation rate and race variance reduction | 400 / 600 |
All distances — reduces RNG, improves consistency |
Understanding these stats is what makes the uma race calculator genuinely useful. When you know that Speed above 1,200 has diminishing returns, you can make smarter decisions about where to allocate your final training points.
The 4 Racing Strategies Explained
Your racing strategy (running style) determines where your Uma positions herself during the race and when she makes her move. Each style has different stamina consumption patterns, skill synergies, and stat requirements — which is exactly why simulating them matters.
1 Runner (逃げ / Front Runner)
Leads from the gun. Highest stamina consumption. Requires strong Speed and enough Stamina to hold the lead through the final stretch. Vulnerable to being caught by closers if stamina runs out early.
Best for: Sprint and Mile distances with high Speed builds
Highest stamina requirement of all four styles
2 Leader (先行 / Pace Chaser)
Sits just behind the front runner. The most balanced style — good stamina efficiency, strong final spurt potential, and wide skill compatibility. Often the safest choice for new players.
Best for: All distances; especially strong in Mile and Mid
Moderate stamina requirement — second highest
3 Betweener (差し / Late Surger)
Runs mid-pack and surges in the final phase. Lower stamina consumption than front styles, but requires strong acceleration skills to close the gap. Highly dependent on skill activation timing.
Best for: Mid and Long distances; skill-heavy builds
Lower stamina requirement — second lowest
4 Chaser (追込 / End Closer)
Dead last until the final corner, then everything. The highest-variance style — when it works, it's spectacular; when skills don't activate, it's a disaster. Requires very specific skill sets.
Best for: Long distances with optimized closing skill sets
Lowest stamina requirement — but most skill-dependent
The uma musume simulator lets you test all four strategies with your exact stats and skills. Don't assume a strategy is wrong for your Uma — simulate it first. The results often surprise even experienced players.
Step-by-Step: How to Use the Uma Race Simulator
Here's the exact workflow I use for every build. Follow these six steps and you'll get reliable, actionable data from every simulation session.
Select Your Target Course and Distance
Start with the end in mind. Choose the specific race you're training for — not just the distance category, but the actual track (Tokyo, Nakayama, Kyoto, Hanshin, etc.). Track layout matters: courses with long downhill sections reduce stamina requirements significantly. For example, Hanshin 3,000m needs roughly 150 fewer Stamina points than Kyoto 3,000m due to its extended downhill segment.
Tip: If you're preparing for Champions Meeting, the event page always lists the exact course and conditions. Use those exact parameters in the simulator.
Choose Your Uma and Racing Strategy
Select your character and assign her running style. Remember that each Uma has aptitude ratings (G through S) for different distances and running styles — a character with A-rank Runner aptitude will perform noticeably better as a Runner than one with C-rank. The simulator accounts for these aptitude modifiers.
Tip: Don't force a strategy that doesn't match your Uma's aptitude. A B-rank Betweener will often outperform a D-rank Runner on the same character.
Input Your Stats
Enter the five core stats: Speed, Stamina, Power, Guts, and Wisdom. You can input your current stats to test your existing build, or enter target stats to see what you need to achieve. This is where the uma race calculator function shines — you can quickly test whether adding 100 more Stamina actually improves your win rate, or whether those points are better spent on Speed.
Tip: Test one variable at a time. Change only Speed, run 30 sims, note the win rate. Then change only Stamina, run 30 sims, compare. This isolates the actual impact of each stat.
Add Skills and Inheritance
Skills are often the difference between a 40% win rate and a 65% win rate. Add your Uma's unique skill, any inherited skills from parents, and support card bonus skills. Pay attention to skill trigger conditions — a skill that activates 'in the final corner' is useless if your Uma is already in the lead by then.
Tip: Gold recovery skills (stamina heals) dramatically reduce your stamina requirements. Each gold recovery skill can reduce required Stamina by 100–200 points depending on the distance.
Run Your Simulations
Click Simulate. For initial testing, 20–30 runs give you a directional read. For competitive optimization — especially Champions Meeting prep — run 50–100 simulations. The larger sample size smooths out RNG variance and gives you a statistically reliable win rate.
Tip: Keep a simple notepad open. Log each configuration change and its resulting win rate. After 5–6 iterations, patterns become obvious.
Read and Apply the Results
The simulator outputs placement distribution, win rate, and pace analysis. Focus on median performance rather than best-case results — a build that wins 70% of the time is more valuable than one that occasionally wins 100% but loses 60% of runs. Check the mid-race pace graph: if your Uma loses positions in the middle phase, you likely need corner or positioning skills. If the final spurt is weak, prioritize late-acceleration skills and check your stamina.
Tip: A win rate above 50% is a strong build for most content. For Champions Meeting, aim for 60%+ against representative opponents.
Stamina Requirements by Distance
This is the question every new player asks: 'How much Stamina do I actually need?' The answer depends on your distance, running style, and how many gold recovery skills you have. The table below is generated using the Umalator under standardized conditions (Speed 1,200 / Power 1,200 / Guts 300–400 / Wisdom 600, no downhill tracks, no skills except heals).
| Distance | Front Runner | Leader | Betweener | Chaser | Notes |
|---|---|---|---|---|---|
| Sprint (1,400m) | 570 | 540 | 500 | 510 | Power and Speed matter more here |
| Mile (1,800m) | 800 | 770 | 720 | 740 | Baseline — no recovery skills |
| Mile (1,800m) + 1 Gold Heal | 640 | 600 | 560 | 580 | One gold recovery skill saves ~160 Stamina |
| Mid (2,400m) + 1 Gold Heal | 910 | 930 | 870 | 900 | Leaders need more Stamina than Runners at this distance |
| Mid (2,400m) + 2 Gold Heals | 710 | 720 | 680 | 700 | Two heals make Mid very manageable |
| Long (2,600m) + 1 Gold Heal | 1,130 | 1,110 | 1,030 | 1,060 | Long distance is stamina-intensive |
| Long (2,600m) + 2 Gold Heals | 900 | 870 | 820 | 850 | Two heals are near-mandatory for Long |
| Long (3,200m) + 2 Gold Heals | 1,080 | 1,060 | 990 | 1,020 | Tennosho Spring — the stamina wall |
| Long (3,200m) + 3 Gold Heals | 830 | 800 | 750 | 780 | Three heals bring it to a manageable range |
Important Caveats
- Tracks with significant downhill sections (e.g., Hanshin 3,000m) can reduce requirements by 100–150 Stamina.
- Debuffer opponents in Champions Meeting can increase your effective stamina drain — add a safety margin of 100–150 for PvP.
- Each gold recovery skill has roughly a 70–80% activation chance. Don't rely on three heals all activating in a single race.
- These numbers assume no Speed-boosting skills. Speed skills cause you to run faster and burn slightly more Stamina (typically 10–30 extra).
These numbers come from community simulation work documented in the r/umamusume community on Reddit and cross-referenced with community stamina charts.
How to Read Umalator Results
After you run a batch in this Umamusume race simulator, do not look only at the best finish. Read the result like a small experiment: Umalator shows whether the build survives, where it loses ground, and whether one change is consistent enough to matter.
| Result signal | What it means | Action to take |
|---|---|---|
| Average gap or length difference | Shows the typical distance between your build and the reference opponent across the batch. | Treat a small gap as close; change one variable and rerun the same sample size. |
| Placement spread | A build with many 1st and many 9th places is volatile even if the best run looks strong. | Check Wisdom, blocking risk, and skill trigger reliability before trusting the win rate. |
| Stamina failure or weak final spurt | The build cannot keep enough HP for the last phase or spends too much before the spurt. | Use the stamina calculator, add recovery, or lower speed assumptions and rerun. |
| Skill timing graph | Shows whether skills fire in useful race phases or stack in a redundant window. | Swap redundant skills for course-specific acceleration or recovery choices. |
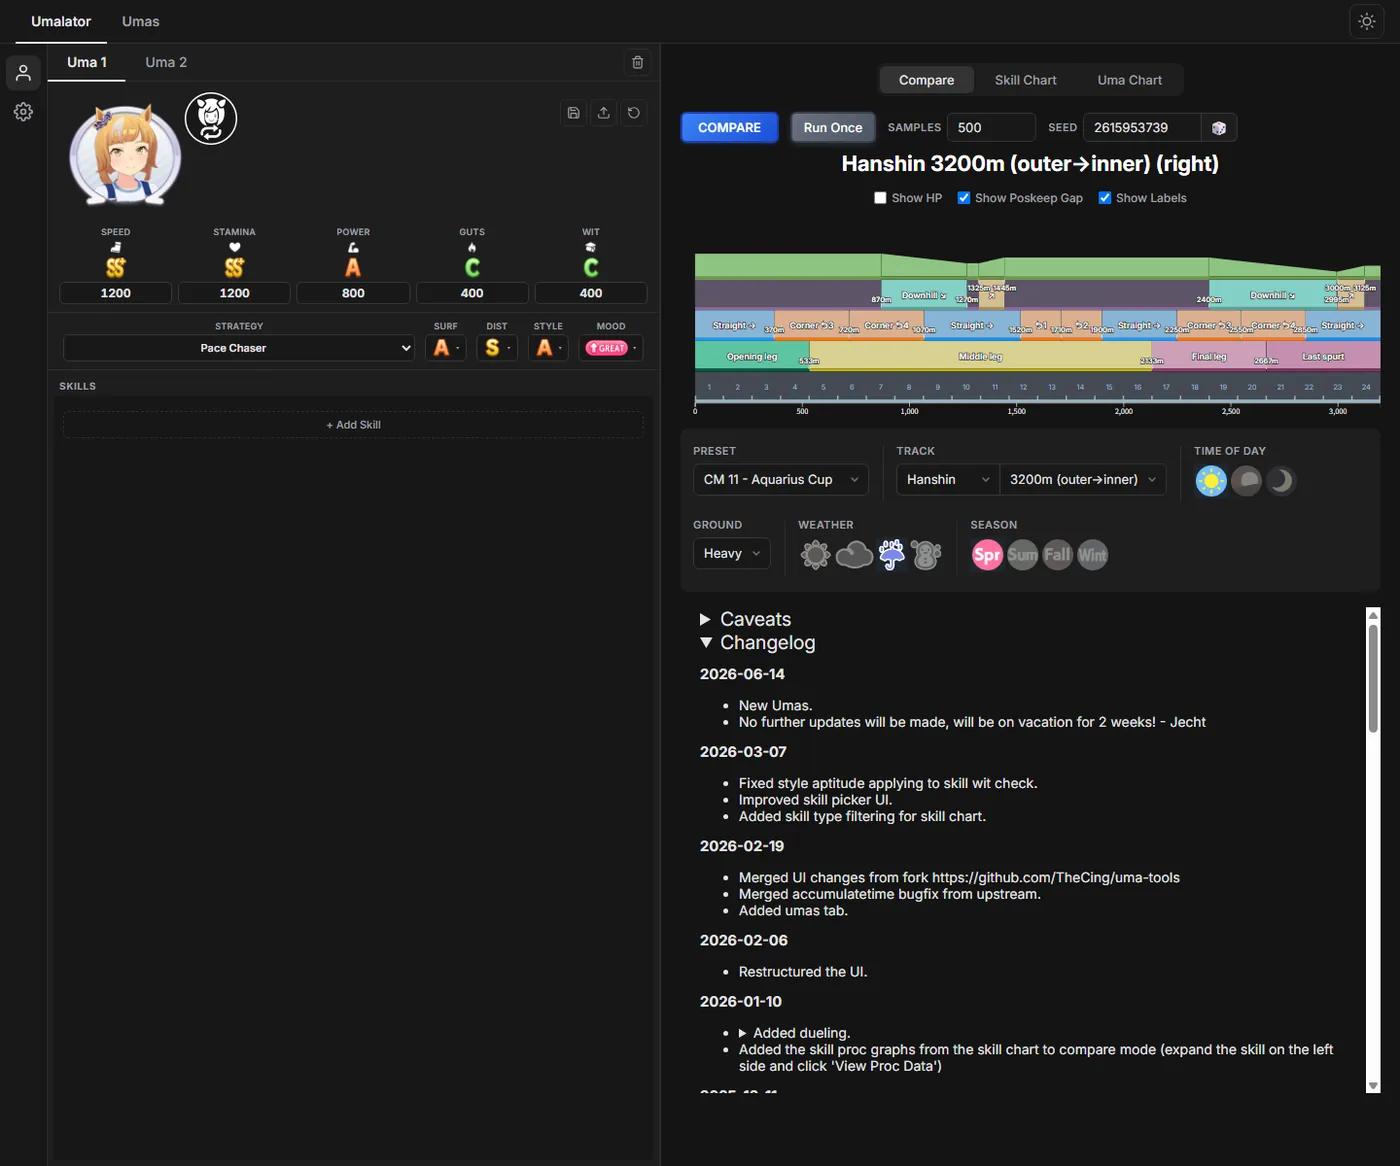
For competitive decisions, keep a small log: course, strategy, stats, skills, run count, win rate, average gap, and the one variable you changed. This prevents overreacting to one lucky batch.
Umalator Not Working? Quick Checks
If Umalator is not working or a result looks impossible, check the inputs before assuming the simulator is broken.
- Check the required course fields Confirm the track, distance, surface, weather, season, and running style. A missing or mismatched course setting can make a valid build look wrong.
- Start with a small test Run once or use 20–30 samples first. If the page responds normally, increase to 50–100 simulations for a competitive comparison.
- Review skill triggers A skill may be listed correctly but still fail to help when its activation window does not match the course or strategy. Compare the skill graph before changing stats.
- Keep the comparison controlled Use the same course, opponent, sample count, and seed assumptions while changing one variable. This makes a Umalator result easier to reproduce.
If a result still looks impossible, save the course settings, stats, skills, and sample count before reporting the issue. That record is more useful than a screenshot of a single race.
Champions Meeting Prep Workflow
Champions Meeting is the 3v3v3 PvP mode where preparation is everything. The race conditions — track, distance, surface, weather — are fixed and announced in advance. That means you have days to simulate before the event starts.
Here's the workflow I use for every Champions Meeting:
-
Check the event conditions
Note the exact track, distance, surface (turf/dirt), and any weather modifiers. These go directly into your simulator inputs. -
Identify the meta running styles
Community resources like the Umamusume subreddit and game wikis will quickly surface which running styles are dominant for the specific conditions. Simulate against those. -
Build and simulate your team
Run each of your three Umas through 50+ simulations against representative opponents. Aim for a win rate above 60% for your primary carry. -
Test skill interactions
Champions Meeting often has debuffer Umas that drain opponents' stamina. Add extra Stamina margin (100–150 points) to your builds to account for this. -
Finalize 48 hours before
Lock in your builds at least 48 hours before the event. Last-minute changes based on incomplete data often hurt more than they help.
Pro Tip
The simulator is most powerful when you use it to test your build against specific opponents, not just in a vacuum. If you know the meta, you can import representative opponent stats and see your actual win rate against the field you'll face.
For a deeper understanding of the game's underlying mechanics, the Umamusume: Pretty Derby Wikipedia article provides a solid overview of the game's history, development, and core systems — useful context for understanding why the simulator was built the way it was.
Common Mistakes to Avoid
After watching hundreds of players struggle with the same issues in Steam community discussions, these are the mistakes I see most often:
1. Running too few simulations
Twenty runs is a starting point, not a conclusion. Umamusume races have significant RNG — skill activations, blocking events, Wisdom rolls. A 20-run sample can show a 70% win rate that's actually 45% over 100 runs. For anything competitive, run at least 50.
2. Ignoring the track layout
Selecting 'Long distance' without specifying the actual track is like navigating without a map. Kyoto 3,200m and Hanshin 3,000m have completely different stamina profiles due to their elevation changes. Always use the exact course.
3. Overfitting to one course
A build optimized for Tokyo 2,400m might underperform on Nakayama 2,500m. If your Uma needs to race multiple courses, validate across all of them before committing.
4. Stacking duplicate skill triggers
Two skills that both activate 'at the start of the final corner' don't double your benefit — diminishing returns apply. The simulator will show you this: swap one for a different trigger window and watch your consistency improve.
5. Forgetting the Guts floor
Guts doesn't just help under pressure — it sets a minimum speed floor when your Uma is low on stamina. For Sprint and Mile, 300 Guts is the standard reference. For Mid and Long, 400 Guts. Going below these thresholds makes your Uma dramatically more vulnerable to stamina-out scenarios.
Decision Checklist
Use this quick checklist before you leave the guide and start changing a build. It keeps the simulator workflow focused on one decision at a time.
| Check | Why it matters | Next action |
|---|---|---|
| One variable changed | Changing stats, strategy, skills, and course at once hides the real cause of a result. | Run a baseline, then change one input and compare the same number of simulations. |
| Enough repetitions | A small sample can exaggerate skill RNG and blocking variance. | Use 20-30 runs for screening and 50-100 runs for competitive decisions. |
| Result becomes an action | A simulator result is useful only if it tells you what to adjust next. | Send stamina concerns to the stamina calculator, schedule pressure to the planner, and reward tradeoffs to the race bonus calculator. |
Frequently Asked Questions
About the Author

Yuki Tanaka
Umamusume Enthusiast & Strategy Writer
Yuki has been playing Umamusume Pretty Derby since the JP launch and covers competitive strategy, build optimization, and simulator tools. She believes every trainer deserves data-driven decisions, not just luck.
References & Further Reading
- Umamusume: Pretty Derby — Wikipedia, the free encyclopedia — en.wikipedia.org
- Required Stamina Chart — UmaReference Community Guide (umareference.com) — umareference.com
- Uma Musume Race Simulator Guide — Umalator.com Blog
- Umamusume: Pretty Derby on Steam — Cygames (steampowered.com) — steampowered.com
- r/umamusume — Reddit Community Wiki and Strategy Discussions — reddit.com/r/umamusume
Last updated: August 13, 2026