Umalator Spurt Rate Guide: Why It Shows 0% and How to Fix It
Read the result correctly, isolate the cause of a failed full spurt, and improve the build without blindly stacking stamina.

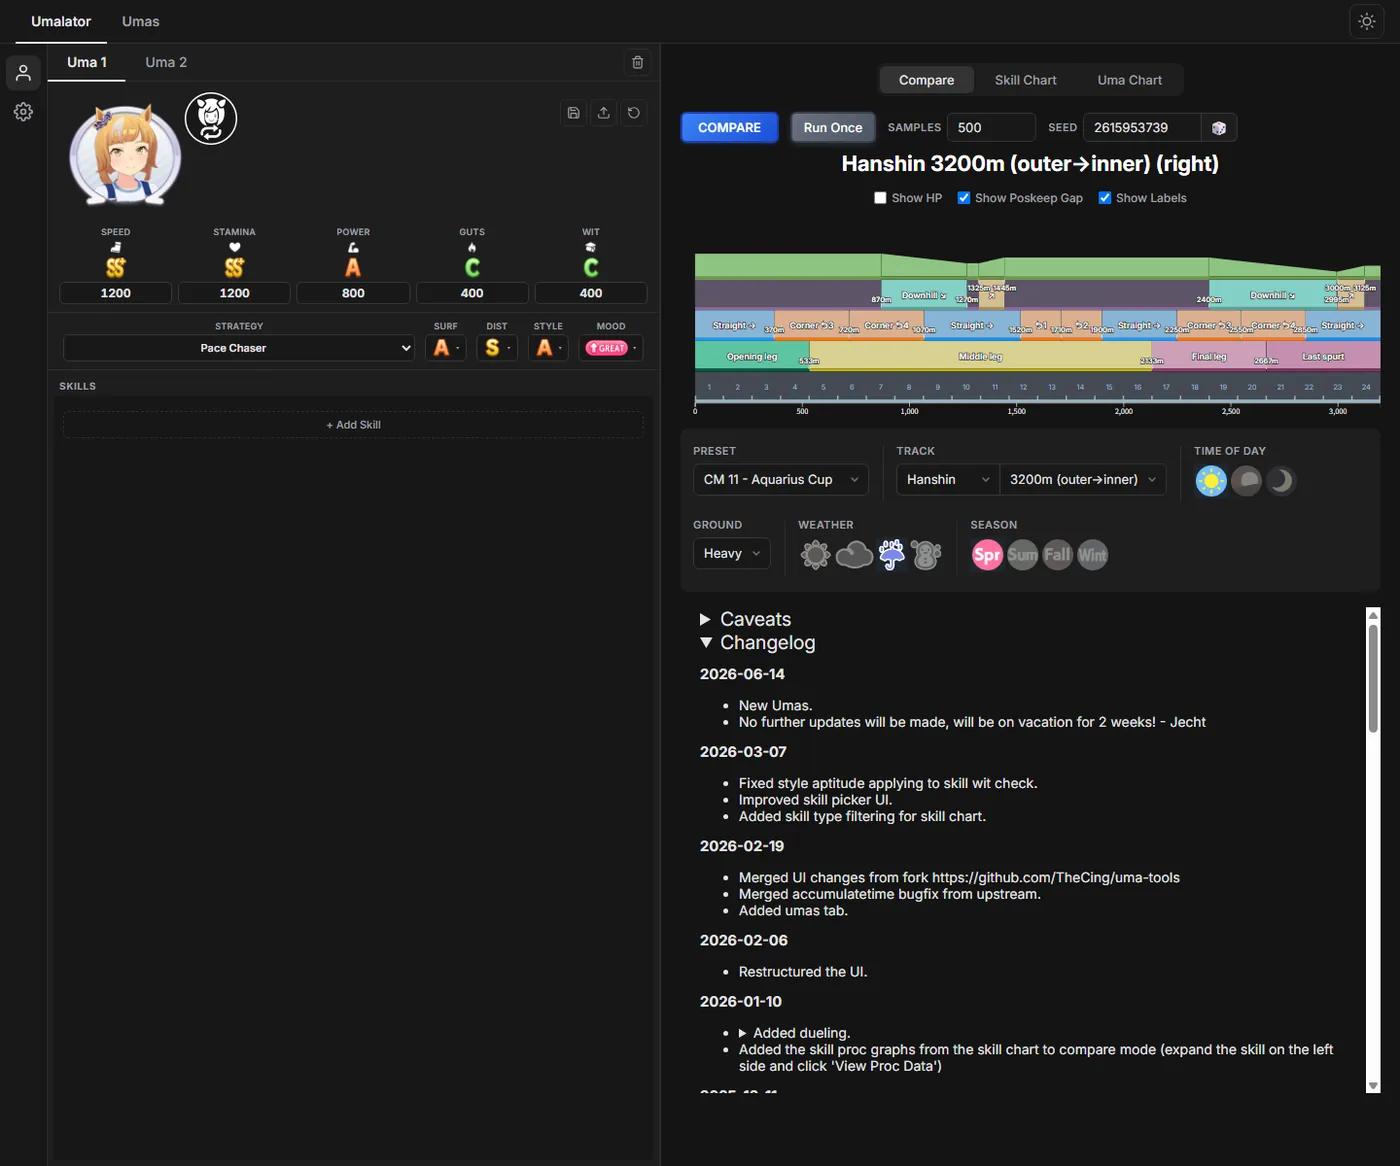
Quick answer: Umalator spurt rate estimates how often the selected Uma can begin late race with the simulator's full target spurt instead of using a slower or delayed candidate. A 0% result usually means the current combination of course, stamina, guts, mood, strategy, recovery activations, and simulation options cannot pass that check. Verify the inputs first, then compare one change at a time. Spurt rate is not the same as win rate or survival rate.
What Does Umalator Spurt Rate Mean?
In Umamusume race mechanics, the last spurt is the late-race phase where a runner tries to accelerate toward her final target speed. The simulator evaluates whether the Uma has enough remaining HP for a full-speed, full-duration spurt candidate. Umalator then reports the share of simulated runs that meet that check as Spurt Rate or Full Spurt Rate, depending on the fork and display mode.
This metric is narrower than overall race performance. It does not promise a win, good positioning, a clean lane, correct acceleration timing, or successful skill activation. It answers a stamina-related question under the exact model and inputs you supplied: how often did this build qualify for a full spurt at the start of late race?
The result should therefore be read beside course distance, ground, weather, mood, running strategy, stat values, aptitudes, skills, sample count, and any RNG options. Changing one of those inputs can move the percentage even when the displayed stamina number stays the same.
Spurt rate
How often the simulated runner qualifies for the modeled full late-race spurt. A failed check can produce a lower target velocity, shorter spurt, or delay.
Survival rate
How often the runner still has HP at the finish under the simulation. A runner can begin a full spurt and later run out, so 100% spurt does not automatically prove 100% survival.
How to Read a 0% Spurt Rate Result
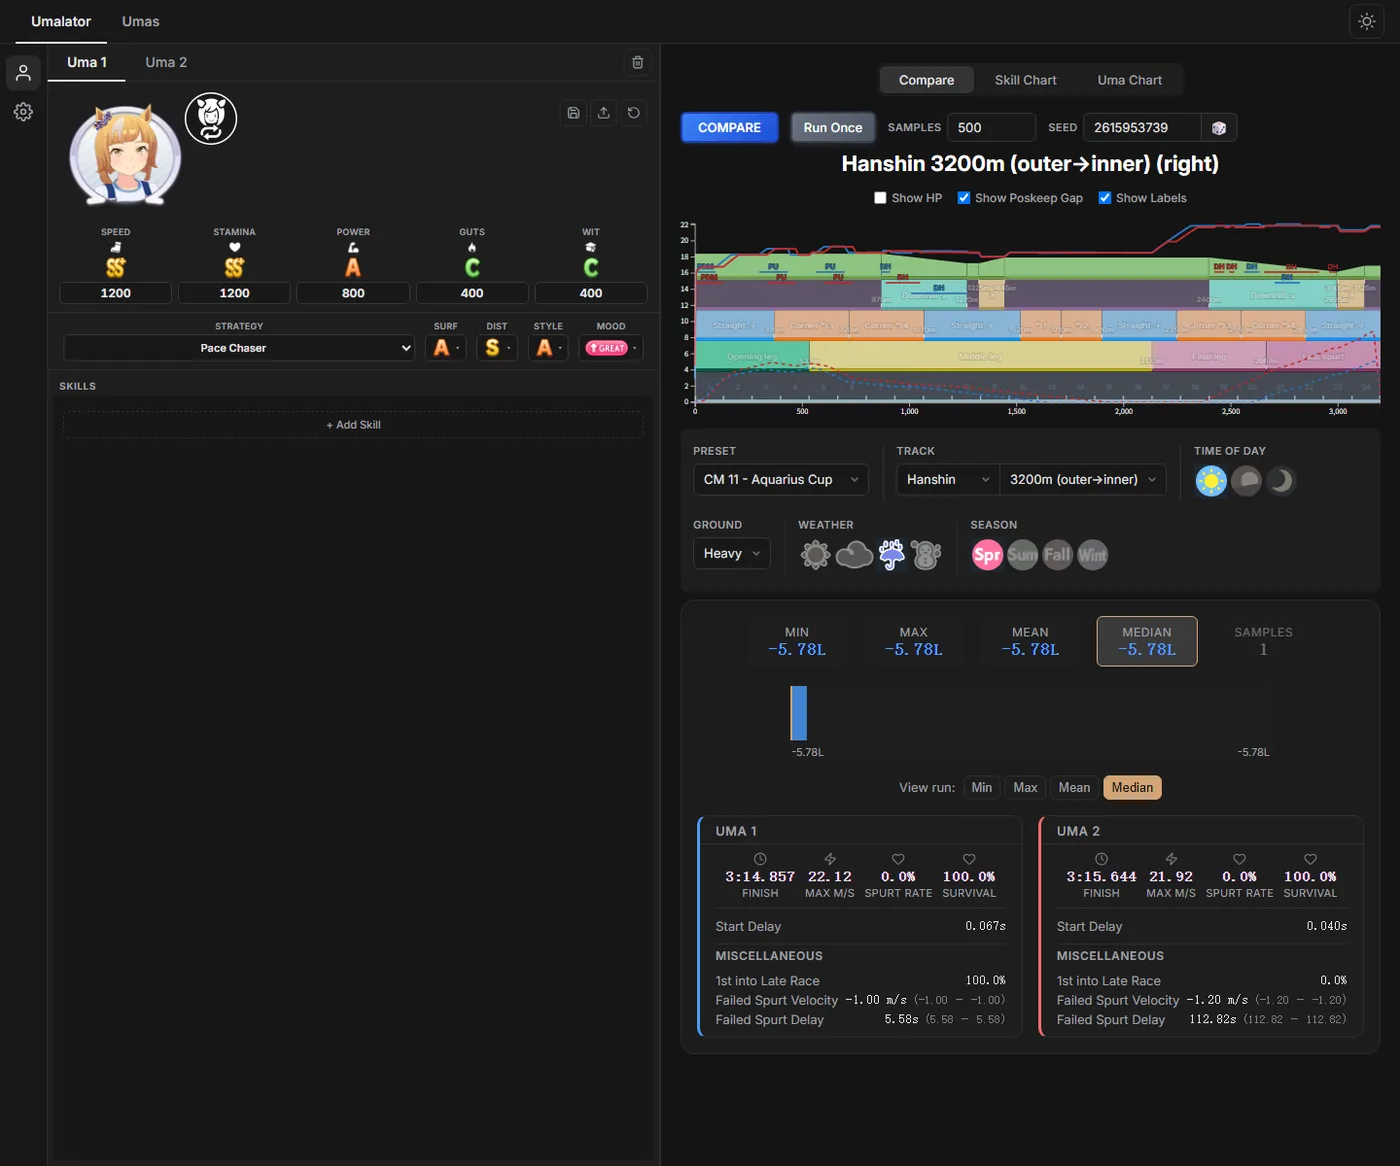
The example below uses the real Kachi Umalator compare view. With the shown 3200 m heavy-track setup and no recovery skills, both example runners return 0.0% Spurt Rate while Survival remains 100.0%. That is not a contradiction: the simulator found a way for each runner to finish, but not to begin late race at the full modeled spurt target.
Look beyond the headline percentage. Failed Spurt Velocity estimates the velocity lost against the full-spurt candidate, while Failed Spurt Delay shows how long the modeled runner delays or compromises the spurt. Sample count matters too: a single Run Once result confirms that the configured case can fail, but it is not a stable probability estimate. Use a larger batch when recovery activation, wit checks, downhill mode, or other randomness can change the outcome.
| Result | What it tells you | How to use it |
|---|---|---|
| Spurt Rate | Share of runs that reach the modeled full-spurt condition | Compare builds under identical course and RNG settings |
| Survival | Share of runs that finish with HP remaining | Check separately; do not infer it from spurt rate |
| Failed Spurt Velocity | Modeled speed shortfall when full spurt fails | Use the size of the loss, not only a pass/fail label |
| Failed Spurt Delay | Modeled delay or reduced-duration effect | Identify whether the stamina miss is small or severe |
| Samples | Number of simulations behind the summary | Increase it before making expensive skill or inheritance choices |
Why Does Uma Spurt Rate Show 0%?
A zero result is usually an input or endurance problem, but the fastest fix is diagnosis rather than adding random stats. Check these causes in order.
The course is longer or harsher than expected
Distance, heavy or soft ground, hills, and course geometry can raise HP demand. Confirm the exact preset and conditions instead of testing a generic distance.
Stamina and guts are below this setup's need
Stamina feeds the HP calculation, while guts affects last-spurt consumption and late-race behavior. The correct balance depends on distance, strategy, and the game's active mechanics.
Recovery skills are missing or modeled incorrectly
A recovery may activate too late, fail its condition, or lose its wit check. Add only skills the trainee can actually own and configure their activation assumptions realistically.
Mood, aptitude, or running strategy is wrong
A copied build can produce a different result when mood, distance aptitude, surface aptitude, or strategy differs. These fields are easy to overlook when loading or rebuilding an Uma.
The sample is too small
Run Once can show one failure. It cannot tell you whether the true modeled rate is 0%, 40%, or 95% when random recovery and wit checks matter. Use repeated samples.
You are comparing different assumptions
If the course, seed, RNG sync, opponent, skill activation, or force-full-spurt setting changes between tests, the percentage difference cannot be assigned to the stat or skill you intended to test.
How to Improve Umalator Spurt Rate Without Wasting Stats
Keep one baseline build, change one variable, and rerun the same scenario. This makes the simulator a decision tool instead of a number generator.
- Lock the event conditions. Select the exact track, distance, direction, ground, weather, season, time of day, and mood you expect to evaluate.
- Verify the trainee input. Check speed, stamina, power, guts, wit, strategy, distance/surface/style aptitudes, unique level, and every equipped skill.
- Create a no-change baseline. Run enough samples to record Spurt Rate, Survival, failed-spurt velocity, failed-spurt delay, and the current result distribution.
- Test a realistic stamina increase. Add the amount you could actually gain through inheritance, support choices, training, or a green skill. Do not jump straight to an impossible max-stat build.
- Test one recovery package. Compare the exact purchasable recovery skill and its activation assumptions against the same baseline. Check whether it improves both spurt and survival consistently.
- Stress-test bad cases. Try normal or worse mood, relevant debuffs, heavy ground when applicable, and realistic wit checks. A build that passes only under optimistic settings is not robust.
- Spend the opportunity cost deliberately. If a recovery skill raises reliability, compare that gain with the speed, acceleration, or positioning skill you would give up. The highest spurt rate is not always the highest win rate.
Should You Aim for 90%, 95%, or 100% Spurt Rate?
There is no official universal target. Community guides often use roughly 90–99% as a practical competitive range and some players treat about 95% as a comfort threshold, but those are risk preferences, not game rules. The right target depends on the event, the number of races, build cost, recovery reliability, expected debuffs, and how much performance you sacrifice to buy extra endurance.
Use the percentage as a decision band. A very low result indicates a clear endurance problem. A borderline result asks whether one affordable change removes a large failure tail. A high result asks whether the final few points cost more than they return. Always review Survival and the magnitude of failed-spurt losses beside the headline rate.
| Modeled band | Practical interpretation | Next test |
|---|---|---|
| 0–49% | Frequent full-spurt failure under the chosen assumptions | Recheck inputs, then test meaningful stamina or recovery changes |
| 50–89% | The build can full-spurt but remains sensitive to variance | Inspect failure severity and stress-test mood, skills, and samples |
| 90–99% | Often a usable community planning range, not a guarantee | Compare the last reliability gain against skill-point and stat opportunity cost |
| 100% | All sampled runs passed the modeled spurt check | Still verify Survival, positioning, acceleration, larger samples, and less favorable conditions |
A Repeatable Spurt-Rate Testing Workflow
For Champions Meeting or another fixed course, save a baseline and give each experiment a name such as plus-40 stamina, one gold recovery, normal mood, or heavy ground. Keep a short log with sample count and all four result fields. This prevents a later test from quietly using a different preset.
When two builds are close, run larger batches and compare distributions rather than only the mean length or one win. If a change improves Spurt Rate but damages acceleration timing or skill value, return to the race goal: the simulator supports a decision; it does not replace matchup testing.
- Keep the seed or RNG policy consistent. Use synchronized assumptions for clean A/B comparisons, then test independent variance separately.
- Change only one build variable. A stamina increase and a new recovery skill in the same run hide which change produced the result.
- Record failed cases. A 95% rate with tiny delays is different from a 95% rate whose failures lose the race by several lengths.
- Retest the final purchasable build. Enter the exact skills and stats you will use before spending points or locking the trainee.
For the broader setup, combine this process with the Umalator usage guide, Umamusume stamina calculator, Champions Meeting preparation guide so the endurance check stays tied to the real course and team plan.
What Spurt Rate Cannot Prove
Umalator is an open-source community simulator. Its maintainers document approximations for lane movement, opponent-dependent conditions, blocked or proximity-based skills, and other mechanics that cannot be reconstructed perfectly. The result is useful for controlled comparisons, but it is not an official Cygames forecast.
Spurt rate also cannot prove win probability. A runner may full-spurt from poor position, miss the correct acceleration window, activate the wrong skill chain, encounter traffic, or lose to a faster build. Conversely, a less-than-perfect spurt result may be an acceptable trade when the saved stats or skill points produce a stronger overall race plan.
Check the simulator changelog and caveats when a patch, regional update, or new mechanic changes the model. This page was verified against the Kachi Umalator interface on July 25, 2026; the visible changelog's latest entry at that check was June 14, 2026.
Umalator Spurt Rate FAQ
Why is my Uma spurt rate 0 even with high stamina?
High stamina alone does not guarantee the modeled check. Verify course distance and ground, guts, mood, strategy, aptitudes, recovery activation, wit checks, and force-full-spurt or RNG options. Also use more than one sample before treating the value as a stable probability.
Does 100% spurt rate mean 100% survival?
No. Spurt Rate concerns qualifying for the full modeled late-race spurt, while Survival concerns finishing with HP remaining. A runner can start a full spurt and later run out, especially when stamina-draining effects or later race costs matter.
Is 95% spurt rate enough for Champions Meeting?
Some community players use about 95% as a comfort target, but it is not an official rule. Judge the cost of the missing percentage, failure severity, number of event races, expected debuffs, and what speed or acceleration value you sacrifice to gain more endurance.
Should I add stamina or a recovery skill first?
Test both against the same saved baseline. Prefer the option that is realistically obtainable, activates at a useful time, remains reliable under wit and mood assumptions, and gives the best total race value after skill-point or training opportunity cost.
How many Umalator samples should I run?
Use a small batch to check direction, then a much larger batch before an expensive final choice when recovery activation or other randomness matters. There is no magic count for every setup; increase samples until the comparison stops swinging enough to change your decision.
Is Umalator spurt rate the same as win rate?
No. Spurt Rate is an endurance-related simulation output. Win rate also depends on opponents, positioning, acceleration timing, lane movement, skill triggers, course fit, and mechanics that the simulator may approximate.
Use Spurt Rate as a Controlled Endurance Check
When Umalator shows 0% Spurt Rate, start by verifying the course and trainee inputs. Then establish a multi-sample baseline, test one realistic stamina or recovery change, and inspect Survival plus failure severity. This reveals whether the build has a true endurance gap or whether the result came from a mismatched setting.
Do not optimize the percentage in isolation. The best final build is the one that reaches an acceptable reliability band while preserving the acceleration, speed, positioning, and matchup tools needed to win the target race.
Sources and Method Notes
Definitions and limits were checked against the current community tool, its documented mechanics, and independent community explanations. Community targets are labeled as guidance rather than official rules.
- Kachi Umalator Global — live interface, caveats, changelog, and the Spurt Rate output used in the screenshots
- Uma Musume Wiki race mechanics — community documentation of HP and last-spurt candidate behavior
- uma.guide Umalator 101 — community workflow explaining Spurt Rate, Survival, course inputs, and recovery testing
- uma.guide deckbuilding reference — community examples of practical spurt-rate bands and stamina tradeoffs